
Resources at a Glance
How do I set up a blog?
- Demo of setting up a blog on Blogger (YouTube Video)
- Demo of setting up a blog on Wordpress (YouTube Video)
Try It
The resources in this section are meant to help you through the process of setting up, using, and sharing an educational blog. If you have any additional questions about this process after reading and viewing all content listed below, please E-mail this site’s administrator for assistance.
Set up a blog
Choose one of the blog services listed below (either WordPress or Blogger, or you may use a different blogging tool if you have used it before and are familiar with it) and set up two educational blogs using the tool you have chosen. Think about what kind of educational blogs you would like to make (refer back to these suggestions if you need help remembering different types of educational blogs). It is strongly suggested for the purposes of this course that you set up at least two blogs: one for students and one for yourself (for personal reflection on this process).
Choose your blogging tool (Blogger or WordPress) and follow the steps below to set up your own two blogs (it would be best if you used the same blogging tool for both blogs).
XView this tutorialHow to set up a WordPress blog
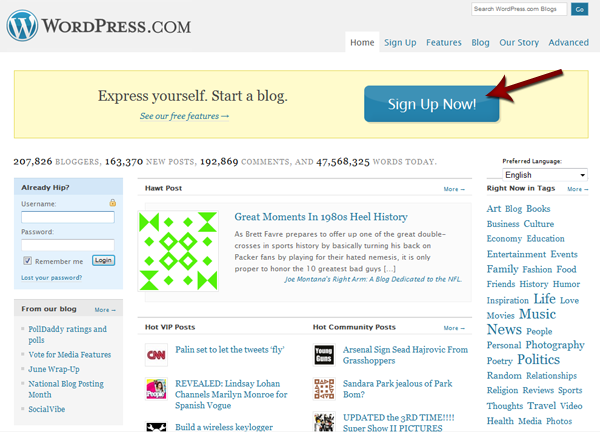
- Open another window in your internet browser and go to http://wordpress.com/.
- Click on the "Sign Up Now" button.
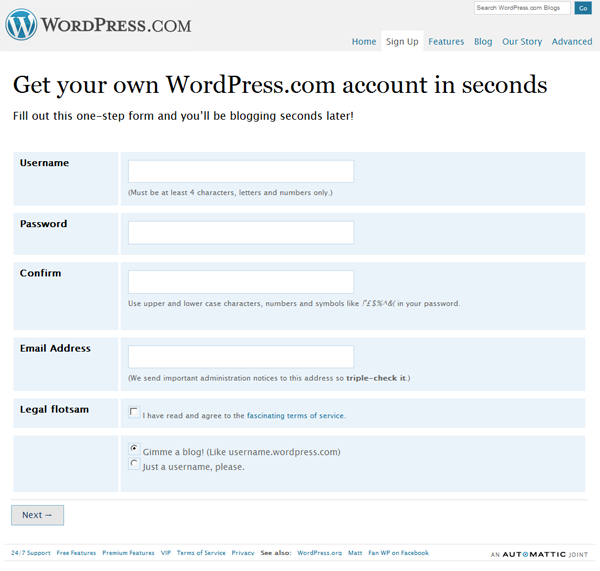
- Create a username and password and provide your current E-mail address.
- Create your blog’s domain name (the Web address for your blog), title (the title that will appear at the top of the blog), and specify your blog’s language and privacy settings.
- Check your E-mail (the same as the address you provided in step three) and click on the link provided in the E-mail to sign in to your new WordPress account.
XView this tutorialHow to Set up a Blogger blog
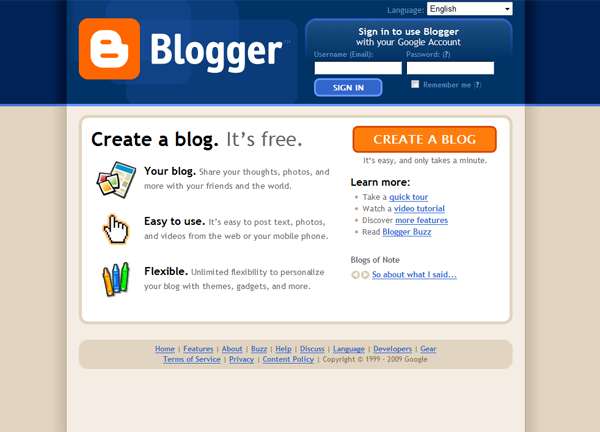


- Open another window in your internet browser and go to https://www.blogger.com/start.
- If you have a Google account, sign in with your Google account E-mail address and password. If not, set up a free Google account by providing a username, password, and valid E-mail address.
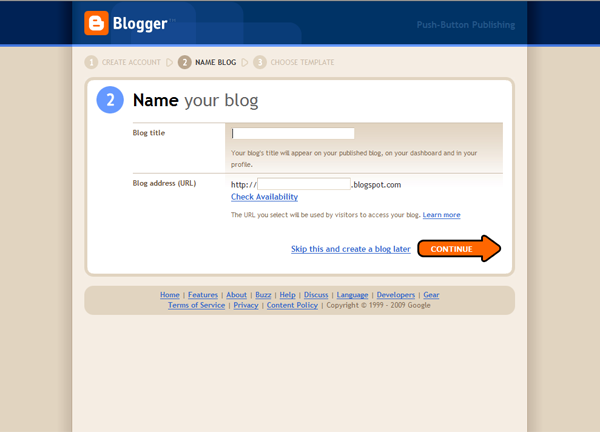
- Create your blog’s domain name (the Web address for your blog) and title (the title that will appear at the top of the blog).
- Choose your blog template.
If you have not already followed the steps above and created two blogs, try it now! (Blogging isn’t much fun if you don’t have a blog.)
Use a blog
Now let’s go ahead and use your new educational blogs. First, let’s use your personal blog (the one you will use as an instructor reflecting on the process of blogging in education). Publish one short blog post (100-300 words each) on your instructional blog about the use of blogs for educational purposes. Be creative and personal. Most of all, enjoy yourself!
If you need help publishing a blog post, follow the steps below:
XView this tutorialHow to publish a post on a WordPress blog


- Sign in to http://wordpress.com/.
- Click on the "New Post" button on the top of the screen.
- Write a post title in the space provided.
- Write your post in the large text area. Play around with the buttons above the text area to see what everything does (the more you play, the more you learn!).
- To make your post more searchable, add tags and a category to your post. A tag is a word that you want to be associated with your post, and a category is a group of related posts. To add a new tag or category, click on the "Add new tag" or "Add New Category" buttons on the right side of the screen.
- When you are finished writing your post, you may preview it before making it live for everyone else to see. You may also save it to finish later. If you are ready for your post to be seen by the world, click the "Publish" button on the right side of the screen. You may now view your new post by clicking on the "Visit Site" button on the top left of the screen next to your blog’s title.
- Send us the URLs to your new blogs so that we can see them too! (The URL is the Web address where you can find a specific Web page or file, e.g. http://mentor.ucs.indiana.edu/~rwadholm/tryIt.shtml.)
XView this tutorialHow to publish a post on a Blogger blog
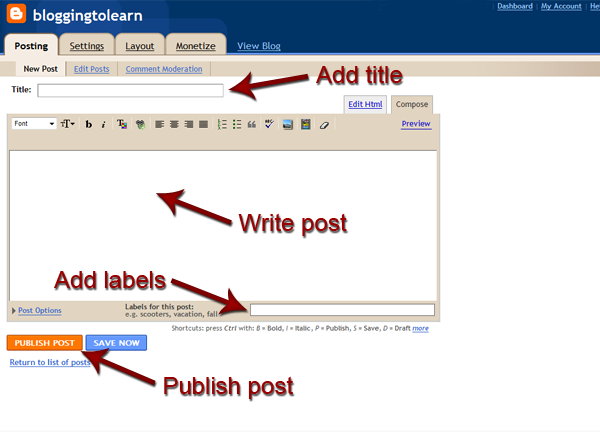
- Sign in to https://www.blogger.com/start.
- Click on the blue "NEW POST" button in the center of the screen.
- Write a post title in the space provided.
- Write your post in the large text area. Play around with the buttons above the text area to see what everything does (why do you think kids learn so fast?).
- To make your post more searchable, add labels to your post in the space provided. A label is a word that you want to be associated with your post.
- When you are finished writing your post, you may preview it before making it live for everyone else to see by clicking on the "Preview" link on the top right of the text box. You may also save it to finish later by clicking on the blue "SAVE NOW" button on the bottom of the screen. If you are ready for your post to be seen by the world, click the "PUBLISH POST" button on the right side of the screen. You may now view your new post by clicking on the "View Blog" link on the top center of the screen.
- Send us the URLs to your new blogs so that we can see them too! (The URL is the Web address where you can find a specific Web page or file, e.g. http://mentor.ucs.indiana.edu/~rwadholm/tryIt.shtml.)
Share a blog
Now it’s time to share your blogging with others (collaboration is the name of the game). Set up your second educational blog (student blog) to accept user comments and posts. Find two or more people to help you by filling the role of "students," by posting or commenting on the blog. Make sure to send us a link to their posts or comments.
If you need help setting up other users on your blog, follow the steps below:
XView this tutorialSet up a WordPress blog to be used by others


- Go to http://wordpress.com/.
- Log in on the upper left side of the screen.
- After logging in, your list of blogs should appear in the same area. Click on the link for the student blog that you set up.
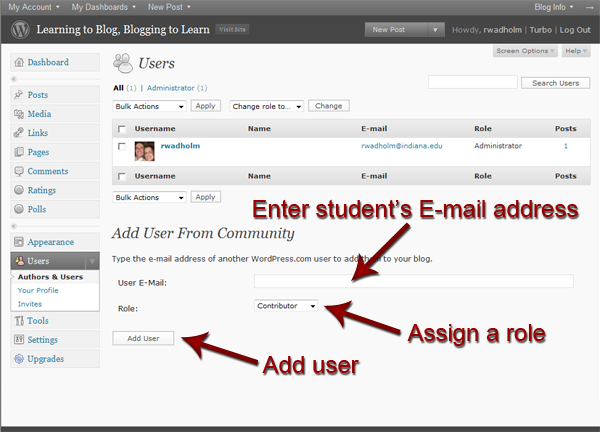
- On the left side of the screen click on the link labeled "Users."
- On the bottom of the screen enter the student’s E-mail address, assign a role, and click on the "Add User" button on the bottom.
- To allow (or disallow) people to submit comments on the blog, click on the button on the left side of the screen labeled "Settings" and then click on the link labeled "Discussion" under that. This screen will give you most of the options you will need to configure your blog to be the way you want it (as far as other users are concerned). Make sure to click on the blue "Save Changes" button before leaving this page (if not, the world will explode). (Not really, but your changes will be lost, and that’s almost as bad.) If you have any trouble, try viewing the YouTube video How to Moderate Comments on Your WordPress Blog.
- Send us the URL to the blog that your "students" have written. (If we like the posts or comments enough, we’ll add them as examples here on the site. If not, don’t worry, we won’t use them as examples of what not to do).
XView this tutorialSet up a Blogger blog to be used by others

- Go to http://www.blogger.com/home.
- Log in to your account on the upper right.
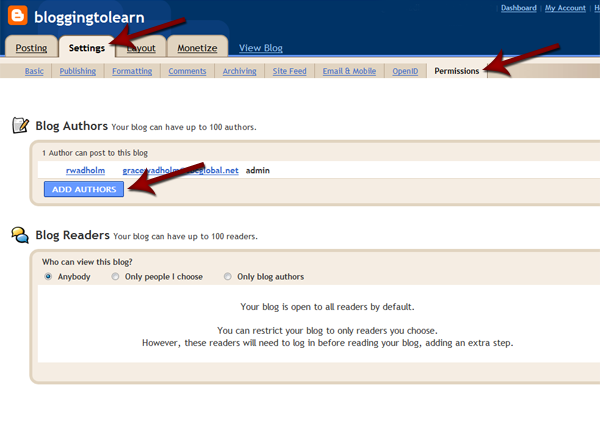
- Find your student blog, and click on the link labeled “Settings” beneath it.
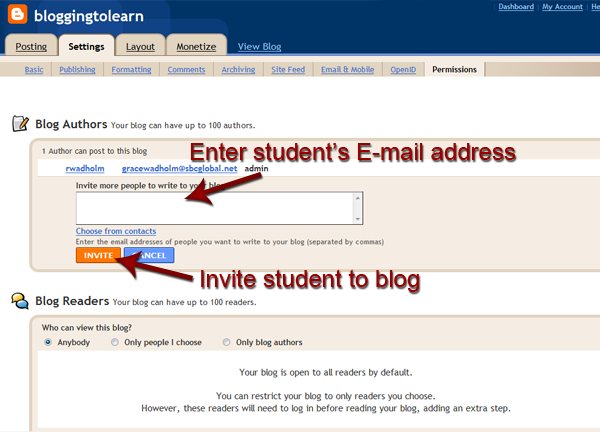
- To allow another person to write posts on the blog, click on the link on the top labeled "Permissions" and then click on the blue button labeled "ADD AUTHORS." Add the E-mail addresses of the student(s) you want to have the ability to write on the blog, and click on the orange button labeled "INVITE."
- To allow (or disallow) people to submit comments on the blog, click on the link on the top labeled "Comments." This screen will give you most of the options you will need to configure your blog to be the way you want it (as far as other users are concerned). Make sure to click on the orange "Save Settings" button before leaving this page (if not, bad things will happen. Namely, you’ll lose several minutes of your life reconfiguring the settings.) If you have any trouble, try consulting the Blogger.com help tutorials on this topic.
- Send us the URL to the blog that your "students" have written. (If we like the posts or comments enough, we’ll add them as examples here on the site. If not, don’t worry, we won’t tell.)